The contents of this page is purely information based on my own personal theories & ideas
DO NOT take any as actual facts! All info provided are based on real information & clues
_____________________________________________________________________________
What could solving the Chiliad mural lines achieve?
The lines comprise of at least 40% of the entire mural. Knowing the meaning to them may help solve a huge part of the mystery. They were added for a reason. This reason could decide on what place/s we should focus the search on.
Help eliminate the many wild theories that have been tossed around in this hunt so far, and has caused many wasted hours on pointless searches.
Improve our understanding of these clues and being able to spot the real leads for a positive result. Help keep the search focused on the clues we've got first, rather than theories on others that don't have a direct link to our main clue the mural.
So what do the lines represent?
Basically they are a map, and the lines are trails or parts of Mount Chiliad terrain you can use to get to each Glyph (clue) location.
One of my first observations when first joining this mural/egg hunt was four of the supposed five Glyphs all had the line/s touching the Glyph boxes on the mural, were the intended viewing direction of where your character could stand (sit) & see each of the Glyphs. [
Example 1.]
 |
| Example 1. |
In hindsight had i not accepted the
wrong Glyph as the fifth Glyph when i started the search, i believe i would have found the last Glyph a lot sooner. Knowing that the lines going to the clue boxes was the intended viewing position, made finding the final Glyph (#5) considerably easier (i was able to find the final Glyph with only a basic idea on its location in less than 10 minutes after it was discovered).
The Chiliad Glyph trail
If you were meant to view these Glyphs from a certain place, then logic tells us the mural lines must represent a path to these points. What confuses many are the lines on the mural are all drawn vertical & horizontal, yet the mountain terrain is not this way. However the directions they show to use are still valid. If the line on the mural heads right, then you follow the route the same way, even tho it may go slightly down or up hill, sometimes the direction is only the way to face, & you may not in fact move towards that direction for more than a second or two.
Another obvious observation I'd noticed, were the lines were not drawn to any actual scale. So you could not count on a short line on the mural as being a short path to follow. I found a couple of the shortest lines were in fact the longest when tracing the paths.
Once i started to follow the paths, i also quickly realized that one Glyph was impossible to reach by foot. The
Rain (Clue_Rain01) Glyph sat on a ledge on the North/West face with no obvious way to get to it without help. [
Example 2.]
 |
| Example 2. |
Solution:
A mode of transport was needed that could traverse the Chiliad mountain terrain but still enable the character to be able to view all five Glyphs from the intended viewing point. I quickly eliminated any cars as a means of transport, due to the 'Rain Glyph' location. The sheer drop from the cliff to the ledge below would be impossible to achieve & survive in any car. The most logical choice would be a trail bike [
Example 3.] or a mountain bike. [
Example 4.] Both of which can be found on or close to Mt Chiliad, or spawned in close proximity to the mountain, similar to the trail bike at the base of Mt Chiliad beneath the cablecar line. [
Example 3.]
 |
| Example 3. |
 |
| Example 4. |
Both have there advantages & disadvantages. The mountain bike requires more physical effort to use, but will traverse the mountain terrain with greater ease. The trail bike can navigate all the mountain terrain with less physical effort, but can be very difficult to control during certain turning & stopping maneuvers.
 |
| Example 5. |
I however decided to use one of the trail bikes that spawn on Mount Chiliad's peak. [
Example 5.] As i was using the presumption that the game developers had already taken for granted that you were already on the mountain peak after viewing the mural in the top cablecar building. That you had assessed the mural & the clues on it, & you would be taking steps to head to the Glyph (clue) locations from there.Once all the Glyphs had been viewed, you would need to return to the peak to see the Chiliad UFO after deciphering the correct answers from all the clues.
Method:
I firstly eliminated some of the lines on the mural that were not applicable to the actual journey to all the Glyphs. I believe they were added to show the connection of each of the bottom three boxes to each path you have chosen (i will explain more detail on this later). Also the line from the eye at the top to the mountain. I also removed the line down the left of the mountain outline to line touching it. Similar to the line from the eye to the mountain, i could not find a reasonable reason to include them since they bear no significant importance to the Glyph trail. I have highlighted all these lines in '
Fuchsia' on the image below. [
Example 6.]
(The reason why i kept some of the other lines will be explained later)
 |
| Example 6. |
To help make this less confusing i decided to show each Glyphs path separately. Using a trail that would make the most obvious sense to me to use, & also the ability of the trail bike to maneuver across it.
I will highlight this path on the mountain images & mural image using two colors (
red &
yellow), one color representing one line, & another for the next line in the path & so forth. I will also highlight the Glyph location as some may not seem obvious due to the distance in some of the images. As i move to the next Glyph i will change the paths previously used color coding to 'White' To help show what lines had previously been used.
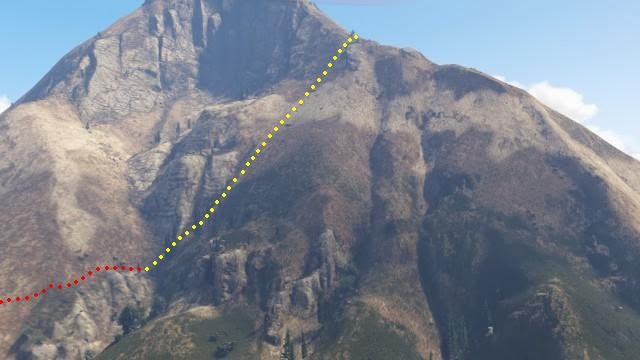
From the top of Mount Chiliad to Glyph#1:
- This is by far the hardest path of all the Glyphs to reach.
 |
| Example 7. |
 |
| Example 8. |
- Head down the mountain from the Chiliad peak, past the old wooden ramp. [Example 9.]
 |
| Example 9. |
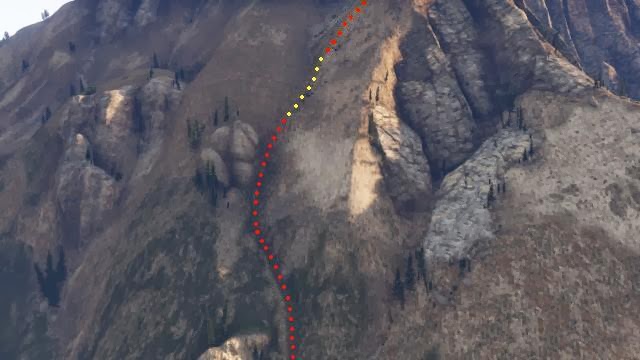
- This will take you towards the West mountain ridge. Once you're past the first row of large rocks while heading down the direction of the West mountain ridge [Example 10.] make a right turn (left turn on the mural) towards the cliff edge. Your character should now be positioned to the right hand side & above the 'Rain (Clue_Rain01) Glyph' on the ledge below.
 |
| Example 10. |
- I suggest creating a game save here before starting the next step, due
to the high difficulty factor required to successfully complete this.
- Proceed to coast the trail bike down the cliff face, use the mountains rock face and also an angled rock that is protruding from the cliff face half way down to the ledge. This will help keep the direction of your bikes movement towards the ledge. [Example 11.]
 |
| Example 11. |
- As you are about to drop from the angled rock to the Glyph ledge below, accelerate your trail bike enough to allow it to perform a slight wheel stand (wheelie). This is so the impact of landing on the ledge front wheel first will be less severe & also lessen the chances of the bike bouncing off this ledge on impact. When landing on the ledge turn your trail bike towards the cliff face & break hard to stop your bike from propelling you into the cliff face, & causing instant death. The slightly angled cliff ledge will also help lessen the momentum from the height drop. Also the front wheel of the bike hitting the cliff face while hard breaking at the same time will also help stop the trail bike in time if timed correctly.
 |
| Example 12. |
- You can now view the 'Rain (Clue_Rain01) Glyph' above your character from the trail bike. [Example 12.]
From Glyph #1 to Glyph #5:
 |
| Example 18. |
 |
| Example 19. |
 |
| Example 20. |
- Head back up the mountain from the 'Half UFO (Clue_Moon02) Glyph' til you are above the large sheer mountain face that sits above it. [Example 20.] Use the rock face edge as a guide on where to ride up the slope.
- Proceed in a straight line heading right, then veer slightly upwards
before going around the mountains West ridge (this will ensure you are on the best line when crossing over the West mountain ridge), & then down the other side
until below the cliff face. This will be just past the gully with the
cablecar line next to it. [Example 19.]
 |
| Example 21. |
- Ride up this gully, using the rock edge as a guide to get your character to the top. Also ensure to stay in the center of the gully lines so your trail bike will make it up the mountain quicker (this route gives more traction for the trail bike). [Example 21.]
- Once you have made it to the top (Chiliad South ridge) head right along the regular hiking track down the mountain until you reach the start of the third Glyphs rocks.
 |
| Example 22. |
- I suggest creating a game save here before starting the next step, due
to the high difficulty factor required to successfully complete this.
- Head down the rocks towards the Glyph crevice. The route to follow down it is easy to work out. Ensure to take it very slow, as the drop from the rocks into the crevice can cause your trail bike to take off on you & results in you flying off the Glyph crevice to the mountain floor below. [Example 22.]
- Inch down the Glyph crevice on the bike until you are in front of the Glyph.
 |
| Example 23. |
- You can now view the 'Moon (Clue_Moon01) Glyph' in front of your character from the trail bike. [Example 23.]
From Glyph #3 to Glyph #2:
 |
| Example 24. |
 |
| Example 25. |
- I suggest creating a game save here before starting the next step, due
to the high difficulty factor required to successfully complete this.
- Carefully maneuver your trail bike in the Glyph crevice so you are facing back up the mountain.
- Head back up the rocks, but instead of going the way up the rocks you came, you should take the path heading straight up from the the Glyph crevice (this path is easier to get up on the trail bike than the previous way down to this location). [Example 26.]
 |
| Example 26. |
- Ride back along the mountain hiking track heading left until you are just past the rocks on the left side of the hiking track. Then head straight for the Pine trees that you will be able to see on a ledge above. [Example 25.]
- You will need to carefully maneuver the bike onto the Glyph ledge, due to there being a number of large rocks & a small gap between the mountain & the ledge (riding a little higher on the cliff face when crossing this point is the best option).
 |
| Example 27. |
- You can now view the 'Mountain (Clue_Mountain01) Glyph' above your character from the trail bike. [Example 27.]
From Glyph #2 to Glyph #4:
 |
| Example 28. |
 |
| Example 29. |
 |
| Example 30. |
 |
| Example 31. |
- I suggest creating a game save here before starting the next step, due
to the high difficulty factor required to successfully complete this.
- Heading to the left of the Glyph ledge, you will notice two ledges below. Carefully coast the trail bike off the Glyph ledge down to the first ledge below, then continuing heading left & coast the bike off it & down to the second ledge below that. [Example 29.]
- Now keep heading left along this ledge until you reach the left side edge of it. Now head up the mountain along the gully below the wooden ramp, ensure to keep the bike momentum up as any hesitation in the ride up this slope will cause your bike to roll backwards all the way to the base of the mountain. [Example 32.]
 |
| Example 32. |
- Then head around a rock ridge & to the West mountain ridge. [Example 29.]
- Ride over the West mountain ridge & travel down the mountain using the mountain side ridge all the way down to below a rock cliff face. [Example 30.]
- Continue heading right (left on the mural) & pass over the top of the rock ridge. [Example 30.]
- Then continue following this line right around the mountain the same direction until you see the Glyph rock, then head around to the center of this rock. [Example 31.]
 |
| Example 33. |
- You can now view the 'Full UFO (Clue_Rain02) Glyph' in front of your character from the trail bike. [Example 33.]
From Glyph #4 back to the mountain peak:
 |
| Example 34. |
 |
| Example 35. |
 |
| Example 36. |
 |
| Example 37. |
- Head back up the mountain from the Glyph following the gully heading between the two mountain ridges. [Example 35.]
- Eventually you will then start to climb up the mountain on a steeper angle, & eventually come to a two path crossroad below a rock face. Take the path to the left & follow this path up the mountain. [Example 36.] ensuring to stay on the line to give the trail bike more traction to climb it.
- You should now be able to navigate around a rock mound at the top & this will connect you to the regular mountain hiking track. [Example 37.]
- Follow the hiking track until you reach the Chiliad mountain peak.
You have now completed the path to all the Glyphs & returned back to the Chiliad peak to see the Chiliad UFO.
____________________________________________________________________________
So why are there still some unused lines on the mural?
 |
| Example 38. |
After almost two months of mapping & plotting, checking & rechecking all the mural lines to the mountain. I was unable to include these five paths into the trail to the five Glyphs, without taking unnecessary routes or almost impossible paths to use. However the first three of the five lines on the image above [
Example 38.] have very unique & significant places of interest at the end of them.
I have used 'White' to highlight the Glyph location & the previous path used on the Glyph trail, then will use the regular color coding of the path again. This will
help you see the direct connection this path that corresponds to the mural
& a previous path used.
Path #1:
 |
| Example 39. |
 |
| Example 40. |
- Following my previous methods of plotting the trails. If you were to choose the closest point on the mural to use, we would head down from Glyph#4 rock face, then head down this gully right (left on the mural), & then continue down this gully when the path straightens. [Example 39.]
- You will come to concrete tunnel, just below the railroad line. [Example 40.]
 |
| Example 41. |
- This tunnel has bars across the front of it, it also travels a
reasonable distance beneath the ground & splits at a T-section point
at the end. [Example 41.] This suggests two possible tunnels inside, one leading left & one to the right. Of all the tunnels you can see & find around the map, there is only one other tunnel with the same structure & design layout as this one.
This tunnel has been thoroughly tested for access using all three characters
at 3am, also using the space docker vehicle, and sounded its horn until the special tone sounds, attempted to destroy the bars with all weapon types including a tank with no success. This
suggests these need a trigger to activate to enable these bars to be destroyed (mostly likely during a cut-scene) if these were intended to be used.
Path #2:
 |
| Example 42. |
 |
| Example 43. |
- Using the Chiliad peak viewing platform as the closest point to start from on the mural. Head down from the viewing platform & onto the hiking trail towards the south mountain ridge.
- Head down the hiking trail till you reach near the base of the mountain. Once you reach the first fork in the hiking trail take the path heading right (left in the mural) & follow this same line across the mountain terrain in the same direction until you reach the very bottom of the mountain. [Example 42.]
- You should now be to the left of the railroad tunnel, then head in a direct line towards the sawmill following the railroad track line. [Example 43.]
 |
| Example 44. |
- This should bring you to a drain & the second concrete tunnel sitting beneath the railroad tracks. [Example 44.]
- This tunnel has bars across the front of it, it also travels a
reasonable distance beneath the ground & splits at a T-section point
at the end. This suggests two possible tunnels inside, one leading left & one
to the right. Of all the tunnels you can see & find around the map,
there is only one other tunnel with the same structure & design layout as this one.
This tunnel has been thoroughly tested for access using all three
characters
at 3am, also using the space docker vehicle, and sounded its horn until
the special tone sounds, attempted to destroy the bars with all weapon
types including a tank with no success. This
suggests these need a trigger to activate to enable these bars to be
destroyed (mostly likely during a cut-scene) if these were intended to
be used.
How did i choose this path when so many have not even counted the outside mountain lines as being a part of any trail or significance in the mural? The elevation height of its location on the mural, & the inclusion of the bottom line that was not included on the other side of the mural. [Example 45.]
 |
| Example 45. |
I had previously attempted many theories on why the lines on the left side of the mural were all grouped & touching the mountain line edge. And soon realized the outside mountain lines were an option to use in plotting a path/s. I had also previously seen & noted that many of the lines were not in scale, so a slight variation of height positions maybe a factor.
However i found that many of the five Glyph locations were very close to their actual elevation level on the mural. Also following the railroad track around to the first tunnel, the height elevation never changed. Also the similar appearance & structure of this tunnel with the only matching tunnel entrance on the map. These combined helped pinpoint & confirm this choice.
Path #3:
 |
| Example 46. |
 |
| Example 47. |
 |
| Example 48. |
- Using the closest point on the mural, we would start from Glyph#5. 'Half UFO (Clue_Moon02) Glyph' location.
- Following the exact same path as was used when going from Glyph#5 to Glyph#3, over the mountains West ridge & below the rock cliff face, instead of heading up the mountain towards Glyph#3, you would continue in a straight path heading right. [Example 47.]
- Continue along this line, which will carry you over three gullies heading down from the mountain. You should now come to the mountain hiking trail. Then head down the mountain until reach the hiking trail again. Turn left (right on the mural) at this point & head for a dirt track with a tunnel entrance. [Example 48.]
 |
| Example 49. |
 |
| Example 50. |
 |
| Example 51. |
- Inside this tunnel [Example 49.] that goes through to the other side of the mountain. You will find two doors labelled 'T 01" [Example 50.] & "T 02" [Example 51.] They have both got keypad panels next to them, with a red light on it. The labels on the walls next to the doors suggest that these could correspond to mean 'Tunnel 01' & 'Tunnel 02'
Both of these doors have been thoroughly tested for access using all three characters,
at 3am, also with the space docker vehicle, and sounded its horn until the special tone sounds, attempted to destroy the doors with all weapon types including a tank with no success. This suggests they may need a trigger to activate opening these doors if they were intended to be used.
Path #4:
 |
| Example 52. |
 |
| Example 53. |
- Using the closest point on the mural, we would start from Glyph#1. 'Rain (Clue_Rain01) Glyph' location.
- Following the exact same path as was used when going from Glyph#1 to Glyph#5, heading down the mountain. Once you have dropped down off the Glyph ledge, turn right (left on the mural) and ride along the bottom of the rocky cliff face til you reach the North ridge.
- Continue over the North ridge until you reach the path leading back to the mountain peak.
Path #5:
 |
| Example 54. |
 |
| Example 55. |
- From the closest point on the mural, we would start from Glyph#4. 'Full UFO (Clue_Rain02) Glyph' location.
- Head up from this Glyph towards the Chiliad mountain peak path.
- Where the trail heads left, head right & follow the mountain path along the mountain track around the rock mound until you reach the mountain ridge.
- Head straight up the mountain trail until you reach the rock edge to head down to Glyph#1 location.
- Carefully ride down the mountain face using the rocks as your guide until you reach the Glyph#1 ledge.
CONCLUSION:
Could these paths & P.O.I (Points Of Interest) be just locations to help you just find the Glyphs?
Or could all these paths be used at some point during your journey to unlock the Chilad Mystery?
____________________________________________________________________________
I hope this information can help you find the answers to solve the Chiliad mystery.
____________________________________________________________________________
Like to know more? ALL INFORMATION PROVIDED BELOW IS 'NOT CONFIRMED!'
Unlocking The Mt Chiliad Glyphs - Part 3
____________________________________________________________________________